Building a Simple Shop Display with Next.js and Google Sheets
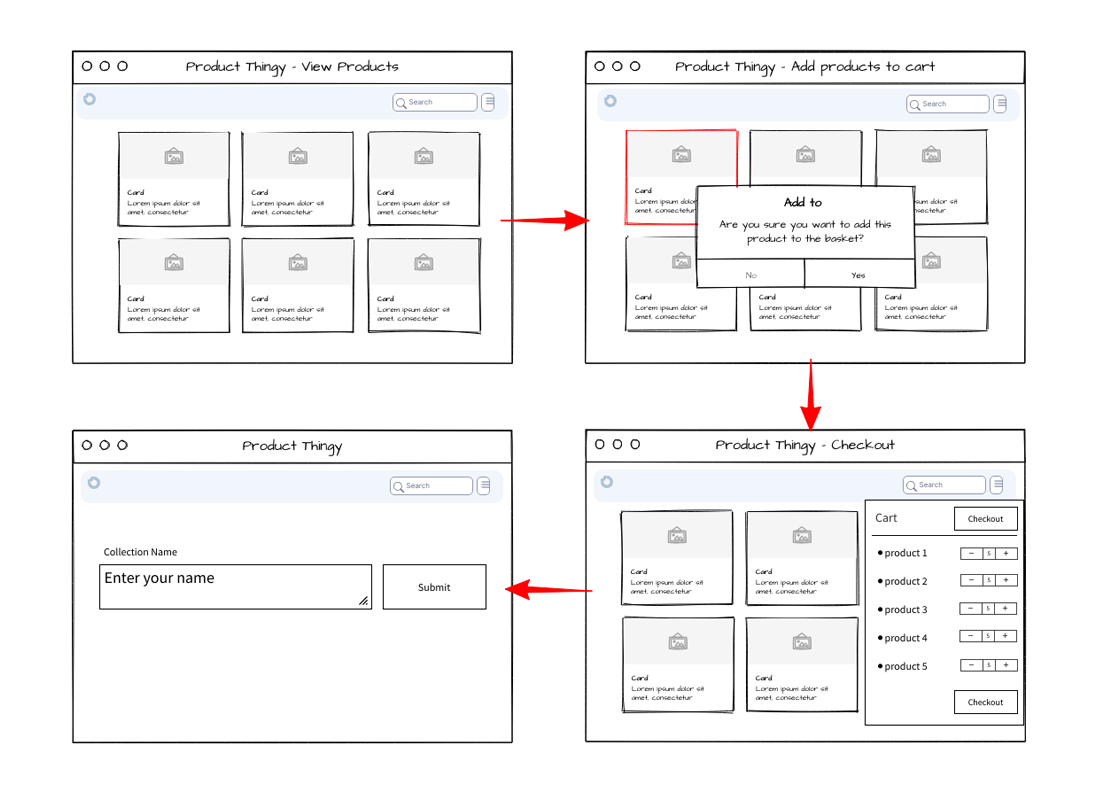
Last month, my mate rang me up with an interesting challenge. Running a busy shop, he needed a modern click and collect system, but without the faff of complicated inventory management software. He wanted customers to browse products on a tablet in his shop window, select items they want, and place orders for collection. Meanwhile, his team needed to manage stock levels and fulfil orders through familiar tools - no complex systems, just straightforward spreadsheets.
FYI - i don’t recommend people using this for anything other than a simple usecase! Not very scalable from my perspective.
The Vision
We built a system that works like this:
- Customers browse products on a tablet display, with real-time stock levels
- They can search items, add them to a cart, and create collection orders
- Upon checkout, they simply enter their name (no payment online - it’s pay at collection)
- The shop manager receives an instant email notification about new orders
- The email contains a secure “Fulfill” button
- Once items are gathered and the button is clicked, stock levels automatically update in the spreadsheet

Setting Up the Google Sheet
First, we created a simple Google Sheet with these columns:
Setting Up Google Sheets API
First things first, we needed to set up Google Sheets integration. Here’s how:
The Product Display
We built a simple, clean display using Next.js:
Email Notifications
We added email notifications using MailerSend for when stock gets low:
Making it a PWA
To get rid of the browser chrome and make it proper tablet-friendly, we turned it into a Progressive Web App:
PWA Compatibility Note
One important caveat: the original next-pwa package isn’t compatible with newer versions of Next.js (13+). Instead, we’re using @ducanh2912/next-pwa, which is actively maintained and supports the latest Next.js features. You can find more information and documentation on their GitHub repository: ducanh2912/next-pwa.
Google Sheets API Considerations
Before diving in, it’s crucial to understand Google Sheets API quotas. The free tier provides:
- Read requests: 300 per minute per project (60 per minute per user per project)
- Write requests: 300 per minute per project (60 per minute per user per project)
For Tom’s shop, these limits were more than adequate. However, if you’re building something with higher traffic, you might want to implement rate limiting or consider a different solution. We implemented caching to stay well within these limits and ensure smooth operation.
Caching Implementation
To optimise performance and reduce API calls, we implemented a robust caching system:
This ensures we’re not constantly hitting the Google Sheets API, while still maintaining data freshness when needed.
Automated Cache Invalidation
One clever bit we added was an Apps Script in the Google Sheet that automatically triggers a cache revalidation when the sheet is updated. Here’s the script:
This script includes several clever features:
- Debouncing to prevent multiple calls during rapid edits
- Retry logic with progressive delays
- Email notifications if revalidation fails
- Sheet-specific targeting
- Error logging
In practice, this means Tom can update his spreadsheet, and customers see the updates within seconds, without any manual intervention needed.
The Result
Tom’s been using this system for a few weeks now, and he’s chuffed with how simple it is. He can update his prices on his phone using the Google Sheets app, and the display updates automatically. The tablet in his shop window runs 24/7, showing current stock and prices, and he gets emails whenever stock runs low.
“It’s bloody brilliant,” he told me last week. “Dead simple to update, and it looks proper professional in the window.”
Key Takeaways
- Sometimes the simplest solution is the best - Google Sheets worked perfectly as a basic database
- Progressive Web Apps make web applications feel native
- Email notifications keep you on top of stock levels
- User familiarity with tools (like spreadsheets) can make or break adoption
The code for this project is available on my GitHub, and you can set it up yourself with just a few environment variables:
Remember, sometimes the best solution isn’t the most complex one - it’s the one that your users can actually use!